How to make a pop-up scene
Created 21 March 2004
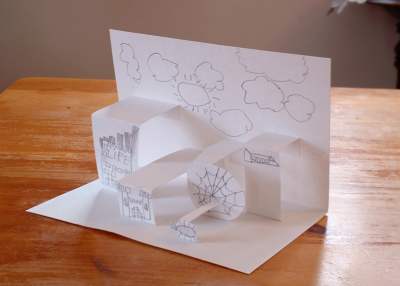
My son and I made this pop-up scene (click it for a larger view):
It was easy and fun, and it really does fold flat then pop up when opened. Here’s how to do it.
To start
You will need stiff paper, drawing tools, scissors, and glue. If you want to be really precise, a ruler could help, but I found it wasn’t necessary.
How much you plan the scene ahead of time is up to you. This technique doesn’t require a lot of planning, so why not just start building, and see how it comes out?
Geometry
Take one sheet of stiff paper, and fold it in half. This will be the sleeve in which the scene is built. The horizontal part is the base, and the vertical part the backdrop.
The geometry of the pop-up is straightforward: each separate element has a vertical front (the part with the drawing), and a horizontal support (that attaches to the backdrop). There are two measurements to get right: the support should be glued to the backdrop the same height as the front, and the front should be glued to the base the same distance from the backdrop as the length of the support.
If those two gluing distances are right, then when the scene is opened, each element will form a rectangle with the base and the backdrop. When the scene is folded shut, they will lie flat. At any point, the drawn part will be parallel to the backdrop, and the supports will be parallel to the base.
Drawing
Draw the backdrop and the base on the sleeve. It’s easier to draw them before construction begins.
Draw each separate element of the scene on a piece of stiff paper. Be sure to leave room beneath the drawing for the tab that will glue it to the base. If the element is supposed to be raised off the base (like the spaceship in our scene), be sure to leave enough blank paper beneath it for that as well.
Each element also needs enough paper left above it for the support.
Building
Each element will be cut in a long vertical strip, and then folded in three places. This will give you a base tab, the drawing front, the horizontal support, and the backdrop tab.
- Fold the base tab. Where this is folded determines how high off the base the element will be.
- Fold the support above the drawing. Try to get the folds parallel, but don’t worry too much about it, this technique seems pretty forgiving.
- To get the dimensions right for the last fold, we’ll use a template. Cut a scrap strip of paper the same length as the distance you want the element from the backdrop. Lay this template on the support part of your piece, and fold around it to get the support the same length as the template.
- Glue the base tab to the base. Use the template to be sure the drawing is the same distance from the backdrop as the length of the template (which is the same as the length of the support).
- To glue the backdrop tab to the backdrop, put the glue on the backdrop tab, fold the element down into its shut position, then fold the scene shut on top of it. This will automatically ensure that the pieces line up properly and shut nicely.
Repeat for each element, then sit back and enjoy your art!
Trickier stuff
These are things I figured out as I went along:
- Not all pieces have to be glued to the base and the backdrop. Elements can serve as the vertical or horizontal foundation for other elements. In our scene, the spider uses the spider web for its backdrop.
- Pieces can overlap visually if you make the support thinner than the piece itself, like the spider web in our scene.
- If you make the horizontal supports as separate pieces, then you can glue them halfway down the back of the element, rather than having them spring from the top of the drawing. This makes them less visible in the scene, and lets you have elements with tops that aren’t flat. I didn’t realize this until after the scene was done. Next time.
See also
- How to make business card cubes, for a more office-oriented crafts project.
- My blog, where projects like this occasionally crop up.

Comments
Add a comment: